#api integration tutorial
Explore tagged Tumblr posts
Visit Tumblr Blog
Explore Tumblr blogs with no restrictions, modern design and the best experience.
Last Seen Tumblr Blogs


Fun Fact
Celebrities use Tumblr as well.
Text
Connect SMSGatewayCenter SMS & WhatsApp API with MoEngage | Step-by-Step
Learn how to integrate SMSGatewayCenter’s SMS and WhatsApp Business API with MoEngage as a custom connector! 📱 This step-by-step tutorial guides you through setting up seamless, TRAI-compliant SMS and WhatsApp campaigns for your business. Perfect for marketers, developers, and businesses in India looking to boost engagement with personalized messaging. 🚀 Follow along and start automating your campaigns today with SMSGatewayCenter!
👉 Get started: https://www.smsgatewaycenter.com/
📢 Subscribe for more tutorials: https://www.youtube.com/@SMS.Gateway.Center
💬 Have questions? Drop them in the comments!
🔗 Related guide: https://www.smsgatewaycenter.com/integrations/connect-moengage-sms/
#SMSGatewayCenter#MoEngage integration#bulk SMS API#WhatsApp Business API#SMS marketing#WhatsApp marketing#DLT compliance#TRAI regulations#custom connector#SMS campaigns#WhatsApp campaigns#business automation#Mumbai businesses#digital marketing#API integration#SMS Gateway Center#MoEngage tutorial#SMS for business#WhatsApp for business
2 notes
·
View notes
Text
Custom API Integration Services
#Custom API Integration Services#integration#api integration services#custom api integration services#salesforce integration#custom api integration#uipath integration service#custom module integration#third party api integration services#crm integration#custom hosted web services#integration service connection builder#salesforce integration tutorial#servicenow rest integration#rest integration servicenow#third-party api integration#servicenow integration using rest
1 note
·
View note
Text
Shopify Commerce APP Plugin Integration Tutorial with API SDK and Libraries
Shopify offers ready to use apps or plugins for 3rd party services like payment, ERP, CRM, search, reviews & rating etc. Shopify Plus is super-fast. It allows custom-code promotions, which have been extremely effective. You can integrate existing systems, apps, plugins like ERP or CRM with Shopify APIs, SDKs or Shopify Plus Partners. You can easily migrate your customer, product, and order data…

View On WordPress
#ecommerce#ecommerce business#shopify#shopify admin api#shopify admin api node js#shopify admin api tutorial#shopify api integration#shopify api postman#shopify api tutorial#shopify app#shopify app development#shopify app development node js#shopify app development tutorial#shopify dropshipping#shopify integration#shopify plugin development#shopify plugin development tutorial#shopify plugin tutorial#shopify plugins#shopify store#shopify tutorial
0 notes
Text
Tldr I'm 98% sure I'll be able to get stuff like Steam achievements working in my game as well as stuff like checking for DLC ownership if the game ever gets popular enough to warrant a DLC.
Also this is Yurei's apartment so far, he needs more furniture! And I gotta adjust the alignment of a mirror so he can have a bathroom mirror without it clipping into the sink or ceiling.
Long boring version: I got basically nothing done on 2-Headed Boy yesterday, found out Steam's API integration thing only supports C++ and if you want Steam features on your Steam game that's programmed in a different language, you basically gotta use a 3rd party service, the website for the one they list as commonly used for my engine was down of course.
But thankfully the RM community came in clutch once again, and someone wrote up a thorough tutorial on a community forum, including a zip file with all the files I needed to update my engine and game etc. for Steam integration. So that's what I did yesterday. And worked my job too, dumb I know but I got bills to pay 🫠
32 notes
·
View notes
Text
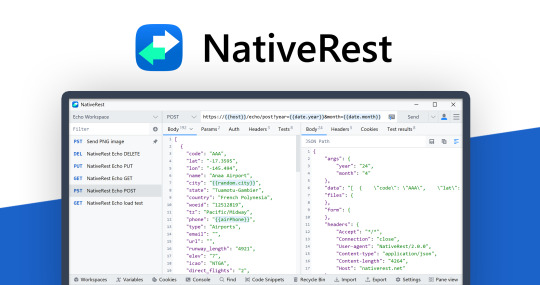
The Next Generation Native REST API Client
Welcome to the official launch of NativeRest—the native REST API client designed to make your API development journey smoother, faster, and more intuitive than ever.
If you’ve used tools like Postman ↗, Insomnia ↗, or HTTPie ↗, you know how essential a powerful API client is for modern development. But what if you could have a tool that combines high performance, a beautiful native interface, and seamless workflow integration—all in one package? That’s where NativeRest comes in.
Why NativeRest?
NativeRest is built from the ground up for speed, efficiency, and a truly native experience. Here’s what sets it apart:
Lightning-Fast Performance: NativeRest leverages native technologies for a snappy, responsive UI that never gets in your way.
Intuitive Design: Enjoy a clutter-free, modern interface that puts your requests and responses front and center.
Advanced Collaboration: Built-in features make it easy to share collections, environments, and test results with your team.
Robust Security: Your data stays private, with secure local storage and granular permission controls.
Cross-Platform Native Experience: Whether you’re on macOS, Windows, or Linux, NativeRest feels right at home.
Get Started
Ready to try it out? Download NativeRest - native rest api client↗ and see how it compares to your current workflow. Want a sneak peek? Check out our YouTube channel ↗ for quick tutorials and feature highlights.
Welcome to the future of API development—welcome to NativeRest!
2 notes
·
View notes
Text
Crafting Web Applications For Businesses Which are Responsive,Secure and Scalable.
Hello, Readers!
I’m Nehal Patil, a passionate freelance web developer dedicated to building powerful web applications that solve real-world problems. With a strong command over Spring Boot, React.js, Bootstrap, and MySQL, I specialize in crafting web apps that are not only responsive but also secure, scalable, and production-ready.
Why I Started Freelancing
After gaining experience in full-stack development and completing several personal and academic projects, I realized that I enjoy building things that people actually use. Freelancing allows me to work closely with clients, understand their unique challenges, and deliver custom web solutions that drive impact.
What I Do
I build full-fledged web applications from the ground up. Whether it's a startup MVP, a business dashboard, or an e-commerce platform, I ensure every project meets the following standards:
Responsive: Works seamlessly on mobile, tablet, and desktop.
Secure: Built with best practices to prevent common vulnerabilities.
Scalable: Designed to handle growth—be it users, data, or features.
Maintainable: Clean, modular code that’s easy to understand and extend.
My Tech Stack
I work with a powerful tech stack that ensures modern performance and flexibility:
Frontend: React.js + Bootstrap for sleek, dynamic, and responsive UI
Backend: Spring Boot for robust, production-level REST APIs
Database: MySQL for reliable and structured data management
Bonus: Integration, deployment support, and future-proof architecture
What’s Next?
This blog marks the start of my journey to share insights, tutorials, and case studies from my freelance experiences. Whether you're a business owner looking for a web solution or a fellow developer curious about my workflow—I invite you to follow along!
If you're looking for a developer who can turn your idea into a scalable, secure, and responsive web app, feel free to connect with me.
Thanks for reading, and stay tuned!
2 notes
·
View notes
Text

Wielding Big Data Using PySpark
Introduction to PySpark
PySpark is the Python API for Apache Spark, a distributed computing framework designed to process large-scale data efficiently. It enables parallel data processing across multiple nodes, making it a powerful tool for handling massive datasets.
Why Use PySpark for Big Data?
Scalability: Works across clusters to process petabytes of data.
Speed: Uses in-memory computation to enhance performance.
Flexibility: Supports various data formats and integrates with other big data tools.
Ease of Use: Provides SQL-like querying and DataFrame operations for intuitive data handling.
Setting Up PySpark
To use PySpark, you need to install it and set up a Spark session. Once initialized, Spark allows users to read, process, and analyze large datasets.
Processing Data with PySpark
PySpark can handle different types of data sources such as CSV, JSON, Parquet, and databases. Once data is loaded, users can explore it by checking the schema, summary statistics, and unique values.
Common Data Processing Tasks
Viewing and summarizing datasets.
Handling missing values by dropping or replacing them.
Removing duplicate records.
Filtering, grouping, and sorting data for meaningful insights.
Transforming Data with PySpark
Data can be transformed using SQL-like queries or DataFrame operations. Users can:
Select specific columns for analysis.
Apply conditions to filter out unwanted records.
Group data to find patterns and trends.
Add new calculated columns based on existing data.
Optimizing Performance in PySpark
When working with big data, optimizing performance is crucial. Some strategies include:
Partitioning: Distributing data across multiple partitions for parallel processing.
Caching: Storing intermediate results in memory to speed up repeated computations.
Broadcast Joins: Optimizing joins by broadcasting smaller datasets to all nodes.
Machine Learning with PySpark
PySpark includes MLlib, a machine learning library for big data. It allows users to prepare data, apply machine learning models, and generate predictions. This is useful for tasks such as regression, classification, clustering, and recommendation systems.
Running PySpark on a Cluster
PySpark can run on a single machine or be deployed on a cluster using a distributed computing system like Hadoop YARN. This enables large-scale data processing with improved efficiency.
Conclusion
PySpark provides a powerful platform for handling big data efficiently. With its distributed computing capabilities, it allows users to clean, transform, and analyze large datasets while optimizing performance for scalability.
For Free Tutorials for Programming Languages Visit-https://www.tpointtech.com/
2 notes
·
View notes
Text
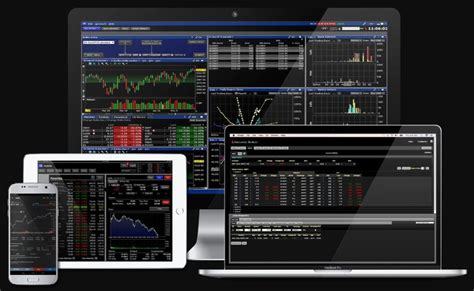
Best Platforms to Trade for Forex in 2025
Forex trading continues to captivate traders worldwide, offering a dynamic and lucrative avenue for financial growth. In 2025, identifying the best platforms to trade for forex has become more crucial than ever, as technology and market demands evolve. From user-friendly interfaces to advanced tools for technical analysis, these platforms are tailored to meet the needs of both novice and seasoned traders. Whether you're diving into major currency pairs, exploring exotic options, or utilizing automated trading strategies, choosing the right platform is the foundation for success.
Core Features of Top Forex Trading Platforms
Forex trading platforms in 2025 must combine advanced functionality with accessibility to meet diverse trader needs. The following core features highlight what distinguishes the best platforms.
User-Friendly Interface
A user-friendly interface enhances efficiency and reduces errors, especially for beginners. Key features include:
Intuitive navigation for rapid trade execution.
Customizable layouts to match user preferences.
Comprehensive tutorials for ease of onboarding.
Efficient design with minimal lag, even during high volatility.
Example Platforms: MetaTrader 4 (MT4) and MetaTrader 5 (MT5) are renowned for streamlined interfaces designed to accommodate traders at all levels.
Comprehensive Charting Tools
Forex trading requires precision, and advanced charting tools are critical for analysis. The following charting tools enhance strategy formulation:
Drawing Tools: Support for trendlines and channels.
Indicators: Integration of MACD, RSI, Bollinger Bands, and Fibonacci Retracement.
Timeframes: Options to analyze data across multiple periods.
Custom Indicators: Flexibility to program and integrate personal strategies.
Automation and Algorithmic Trading
Automation is indispensable for modern forex trading. Platforms like cTrader and NinjaTrader excel with features like:
Pre-built Strategies: Ready-to-use templates for scalping and trend following.
Custom Algorithms: Integration with programming languages such as C# and Python.
Backtesting: Evaluate strategies with historical data.
Integration with APIs: Seamless syncing with advanced trading bots.
Mobile Accessibility

Forex traders increasingly require the flexibility of trading on-the-go. Mobile accessibility ensures:
Synchronization: Real-time updates between desktop and mobile devices.
Push Notifications: Alerts for market changes and trade execution.
Compact Design: Optimized for smaller screens without losing functionality.
App Examples: MT4 and MT5 apps, offering full trading capabilities on iOS and Android.
Key Takeaway: Platforms combining a robust desktop experience with seamless mobile integration empower traders with unmatched convenience.
The best forex trading platforms for 2025 excel in usability, advanced charting, automation, and mobile functionality. By integrating these features, platforms like MT5, cTrader, and TradingView offer versatile solutions for traders of all expertise levels.
Trading Instruments Supported by Leading Platforms
The diversity of trading instruments available on forex platforms is crucial for building effective strategies and achieving long-term trading success. This section explores the breadth and advantages of various trading instruments.
1. Major Currency Pairs
Major currency pairs, such as EUR/USD, USD/JPY, and GBP/USD, dominate forex markets due to their high liquidity and tighter spreads. Leading platforms like MetaTrader 5 and TradingView offer advanced tools for analyzing these pairs, enabling traders to capitalize on predictable movements.
Key Features:
High liquidity ensures minimal price fluctuations during trades.
Access to real-time market data for precise decision-making.
Supported by most trading strategies, including scalping and swing trading.
These pairs are ideal for traders seeking consistent opportunities in stable market conditions.
2. Exotic Pairs
Exotic pairs combine major currencies with currencies from emerging markets, such as USD/TRY or EUR/SEK. While they offer higher potential rewards, they also come with increased volatility and wider spreads.
Risks and Rewards:
Volatility: Significant price movements create potential for larger profits.
Higher Spreads: Costs can be prohibitive for short-term trading strategies.
Economic Dependence: Price movements often correlate with specific geopolitical or economic conditions.
Platforms like cTrader often feature analytical tools tailored for exotic pair trading, helping traders manage the associated risks.
3. CFDs and Futures
Contracts for Difference (CFDs) and futures are derivatives enabling traders to speculate on forex price movements without owning the underlying assets. Futures contracts are often traded on platforms like NinjaTrader, while CFDs are supported on MetaTrader platforms.
CFDs vs. Futures in Forex Trading
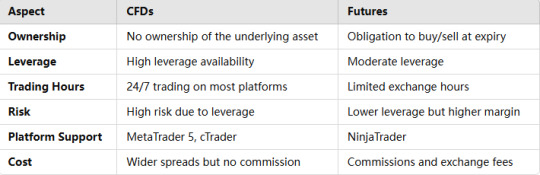
Wider spreads but no commissionCommissions and exchange fees
CFDs and futures cater to traders seeking flexibility and hedging opportunities in volatile markets.
4. Spot Forex vs. Forward Contracts
Spot forex trades settle instantly at prevailing market rates, making them ideal for day traders. Forward contracts, however, lock in future exchange rates and are often used by businesses to hedge against currency fluctuations.
Spot Forex:
Instant execution for quick trades.
Supported by platforms like TradingView, which offers robust charting tools.
Forward Contracts:
Customizable settlement dates.
Reduced risk of unfavorable exchange rate changes.
Forward contracts are frequently utilized for long-term strategies requiring stability.
5. Options Trading in Forex
Forex options provide traders the right, but not the obligation, to buy or sell currencies at a predetermined price. Options trading is supported on platforms like MetaTrader 5, offering flexibility for speculative and hedging strategies.
Advantages:
Defined risk due to limited loss potential.
Compatibility with advanced trading strategies like straddles and strangles.
Access to multiple expiration dates for tailored strategies.
Options trading is an excellent choice for traders seeking diversification and controlled risk in uncertain markets.

Market Indicators for Effective Forex Trading Forex trading in 2025 requires mastery of market indicators for successful trades. Platforms integrating technical tools like RSI, Bollinger Bands, and Fibonacci retracements provide invaluable support for analyzing currency pairs and spotting trends.
1: Moving Averages and RSI
Moving averages and RSI (Relative Strength Index) are staples in forex trading for spotting trends and identifying overbought or oversold market conditions. Here's how they work:
Moving Averages:
Smooth out price data for better trend analysis.
Common types: Simple Moving Average (SMA) and Exponential Moving Average (EMA).
Platforms like MetaTrader 5 (MT5) allow customizable moving average periods for traders’ needs.
RSI:
Measures the speed and change of price movements.
Values above 70 indicate overbought conditions, while below 30 signals oversold.
Both indicators are excellent for detecting market reversals and consolidations, making them essential for scalping and swing trading strategies.
2: Bollinger Bands and Fibonacci Retracements
Bollinger Bands and Fibonacci retracements are complementary tools for determining price ranges and potential reversals.
Bollinger Bands:
Comprised of a central moving average and two bands (standard deviations).
Highlights volatility and identifies breakout opportunities in exotic pairs and minor pairs.
Fibonacci Retracements:
Based on key levels derived from the Fibonacci sequence (23.6%, 38.2%, 61.8%, etc.).
Used to forecast retracement zones for entry and exit points.

Platforms like TradingView provide advanced integration of these tools for technical analysis.
3: Pivot Points and Volume Analysis
Pivot points and volume analysis serve as complementary methods for intraday traders.
Pivot Points:
Calculate potential support and resistance levels based on previous trading sessions.
Widely used in day trading to set intraday targets.
Volume Analysis:
Measures market activity to validate price movements.
Higher volume during breakouts confirms trends.
Together, these indicators help traders plan risk-reward ratios effectively and refine strategies. Platforms offering integrated market indicators like RSI, Fibonacci retracements, and volume analysis provide forex traders with precise insights for decision-making. Combining these tools with strategic risk management and discipline ensures a competitive edge in forex trading for 2025.
Risk Management Tools in Forex Platforms
Risk management is the cornerstone of sustainable forex trading. Platforms offering advanced tools like Stop-Loss Orders and Position Sizing empower traders to mitigate risks while optimizing potential gains.
1. Stop-Loss Orders
Stop-loss orders safeguard capital by automatically closing trades at pre-set levels. Key benefits include:
Capital Protection: Prevents losses from spiraling during volatile markets.
Emotional Discipline: Reduces impulsive decisions by automating exit points.
Wide Platform Integration: Available on MetaTrader 4, TradingView, and cTrader for seamless trading execution.
2. Take-Profit Orders
Take-profit orders lock in profits when the market reaches a target price. Steps for setting take-profit orders effectively:
Analyze Moving Averages and RSI to determine target levels.
Input the price level in trading platforms like NinjaTrader or MT5.
Monitor trade performance and adjust as needed.
3. Position Sizing Calculators
Accurate position sizing minimizes overexposure to any single trade. Here’s how these calculators work:
Calculate lot sizes based on account balance, risk percentage, and stop-loss distance.
Adjust trade sizes to align with Risk-Reward Ratios.
Enable traders to maintain diversified exposure.
4. Risk-Reward Ratio Analysis
Risk-reward ratios evaluate trade viability by comparing potential profits to losses. Tips for effective use:
Aim for a minimum ratio of 1:2 or higher.
Utilize tools like Bollinger Bands to estimate price movements.
Integrated calculators on platforms like MT4 simplify these computations.
5. Diversification Tools
Diversification spreads risk across multiple trading instruments. Features on platforms include:
Multi-asset trading options: CFDs, Futures, and Currency Pairs.
Portfolio analysis tools to track exposure by instrument type.
Real-time updates for Exotic Pairs and niche markets.
6. Backtesting Strategies
Backtesting allows traders to evaluate strategies using historical data. Its advantages are:
Testing risk management techniques like Stop-Loss Orders without live market risk.
Platforms such as TradingView support customizable backtesting scripts.
Insights into strategy weaknesses improve long-term profitability.
With advanced tools for Stop-Loss Orders, Position Sizing, and Backtesting, modern forex trading platforms empower traders to proactively manage risks. Leveraging these features leads to more disciplined and effective trading.
Psychological and Strategic Insights for Forex Trading
Mastering trading psychology is key to navigating the complexities of forex. Platforms enhance this through features that promote discipline, performance tracking, and trader confidence, empowering strategic growth and mitigating psychological pitfalls.
Building Discipline Through Alerts
Platforms offering robust alert systems, like MetaTrader 5, help instill discipline by:
Preventing Overtrading: Custom alerts signal market entry points, limiting impulsive trades.
Time Management: Reminders help traders stick to predefined schedules.
Market Trend Notifications: Alerts for moving averages or Relative Strength Index (RSI) changes enable focused decisions.
Tracking Performance Metrics
Trading platforms integrate tools that help traders evaluate performance, including:
Win/Loss Ratio Analysis: Shows trade success rates.
Equity Curve Monitoring: Visualizes account performance trends.
Journal Features: Logs trade entries and exits for review.
Customizable Dashboards
Platforms like TradingView allow traders to configure dashboards by:
Adding favorite currency pairs and indicators like MACD or Bollinger Bands.
Creating multi-screen setups to monitor multiple trades.
Integrating news feeds to stay updated with central bank announcements.
Educational Resources
The inclusion of in-platform education fosters confidence through:
Interactive Tutorials: Step-by-step videos on strategies like swing trading or technical analysis.
Webinars and Live Sessions: Experts discuss trading instruments like CFDs and options.
AI-based Learning Modules: Adaptive lessons based on trader performance.
By integrating tools for discipline, self-awareness, and strategy refinement, trading platforms empower users to overcome psychological challenges, enhance risk management, and make data-driven decisions for long-term success.
Conclusion
Forex trading in 2025 offers exciting opportunities, but success begins with choosing the right platform. As highlighted throughout this content pillar, top trading platforms like MetaTrader 4 (MT4), MetaTrader 5 (MT5), cTrader, and TradingView stand out for their robust features, diverse trading instruments, and advanced integrations. These platforms empower traders to navigate the complexities of the forex market through tools such as technical indicators like Moving Averages and RSI, risk management solutions like stop-loss orders and position sizing calculators, and integrations with vital economic indicators such as GDP, inflation, and central bank announcements.
The best forex trading platforms not only provide access to currency pairs, CFDs, and other instruments but also integrate cutting-edge charting tools, educational resources, and analytics to build confidence and discipline—critical factors in mastering the psychological demands of trading.
By understanding the interplay between platform features, market tools, and strategy development, traders can optimize their approach to trading forex in 2025. Whether you're focused on scalping, day trading, or long-term swing trading, the right platform will be your foundation for executing trades effectively, managing risk, and staying informed in a fast-paced market.
Take the insights from this guide to make an informed decision, choosing a platform that aligns with your trading goals and enhances your ability to trade forex with precision and confidence. With the right tools and strategies in hand, you're poised to navigate the evolving forex market and unlock its full potential in 2025 and beyond.
2 notes
·
View notes
Text
Exploring the Power of STON.fi’s API & SDK Demo App: A Developer’s Game-Changer

If you're a developer diving into the world of blockchain, especially within the TON ecosystem, you know how overwhelming it can feel to get everything just right. From understanding decentralized finance (DeFi) to building seamless integration, the process is filled with complex layers. But what if there was an easier way to get started with integrating powerful features like token swaps into your app?
STON.fi has launched something that could change the way you work: the STON.fi API & SDK Demo App. This isn’t just a demo—it’s a practical, real-world example that brings the power of the TON blockchain right into your hands.
Why Should You Care?
Think of this demo app as your personal guide in a foreign city. You know your destination, but the roads are unfamiliar. This app shows you exactly how to integrate key features (like swaps) into your decentralized apps (dApps), step by step. Rather than spending hours or days figuring it out, you get a hands-on example of what works, which can save you a lot of time.
Here’s What Makes This Demo App Special
1. It’s Easy to Understand
Instead of vague documentation or unclear tutorials, this demo app shows you a live, working example. It’s like watching a professional chef cook a meal and then being handed the recipe. You see exactly how everything comes together.
2. A Quick Head Start
Let’s face it—time is valuable. As a developer, you don’t want to reinvent the wheel. This demo gives you a clear starting point, making the development process smoother and faster.
3. Shows You the Full Potential
The app isn’t just about showing you how to add one simple feature; it gives you insight into what’s possible with STON.fi’s tools, opening up the door to more advanced ideas and future projects.
Let’s Break It Down
Imagine you’re designing an app where users can trade tokens easily. You’ve got the app’s main features in mind, but you need to figure out how to incorporate a simple token swap function. The STON.fi demo app is your perfect starting point. It gives you a pre-built, working example of how to integrate token swaps, saving you the headache of figuring out how to do it from scratch.
It’s like buying a DIY kit for a project—you get the materials (API & SDK), plus a guide that shows you how to put it all together. No guesswork.
Real Use Cases
1. Building a Wallet with Token Swaps
If you're building a wallet app and want to offer token swaps to your users, this demo app shows you exactly how to integrate that feature. Instead of piecing it together through trial and error, you get a clear roadmap that saves you time.
2. Creating a DeFi Lending Platform
Maybe you’re working on a DeFi lending platform where users can exchange assets. While your main goal is lending, a swap feature makes the process smoother for your users. This demo app walks you through how to add that feature seamlessly.
Why This is a Big Deal
Here’s the thing: the blockchain space is about simplifying processes and opening up new opportunities. Developers should be able to focus on innovation, not get stuck on the technical details. This demo app cuts through the complexity and provides a working example, so you can get to building quickly.
In traditional finance, things move slowly because they’re burdened with outdated systems and red tape. Blockchain, on the other hand, thrives on speed, innovation, and flexibility. Tools like the STON.fi demo app are key in accelerating this innovation by making the technical side easier for developers.
I’ve been in the blockchain space long enough to see how frustrating and time-consuming integrating new features can be. It’s like being handed a complex puzzle without a guide—sure, you might get there eventually, but it’s a lot of wasted effort.
That’s why tools like this demo app are so powerful. They give you clarity. They give you a head start. And most importantly, they save you time. I’ve seen developers waste days just trying to figure out how to add simple functions. With this tool, you can skip that frustration and jump straight into what matters: building great apps.
If you're a developer in the TON ecosystem, the STON.fi API & SDK Demo App is a must-have resource. It’s more than just a demo; it’s a practical tool that helps you integrate powerful features into your projects faster and more efficiently.
Try the API and DEMO
Innovation in blockchain shouldn’t be complicated. The right tools can make all the difference in helping you bring your ideas to life. So dive in, explore the demo, and see how STON.fi can enhance your development experience.
Great things happen when developers have the tools they need. This is one of those tools.
5 notes
·
View notes
Text
WhatsApp Cloud API Setup For Botsailor
Integrating the WhatsApp Cloud API with BotSailor is crucial for businesses seeking to enhance their customer engagement and streamline communication. The WhatsApp Cloud API enables seamless automation, allowing businesses to efficiently manage interactions through chatbots, live chat, and automated messaging. By connecting with BotSailor, businesses gain access to advanced features like order message automation, webhook workflows, and integration with e-commerce platforms such as Shopify and WooCommerce. This setup not only improves operational efficiency but also offers a scalable solution for personalized customer support and marketing, driving better engagement and satisfaction.
To integrate the WhatsApp Cloud API with BotSailor, follow the steps below for setup:
1. Create an App:
Go to the Facebook Developer site.
Click "My Apps" > "Create App".
Select "Business" as the app type.
Fill out the form with the necessary information and create the app.
2. Add WhatsApp to Your App:
On the product page, find the WhatsApp section and click "Setup".
Add a payment method if necessary, and navigate to "API Setup".
3. Get a Permanent Access Token:
Go to "Business Settings" on the Facebook Business site.
Create a system user and assign the necessary permissions.
Generate an access token with permissions for Business Management, Catalog management, WhatsApp business messaging, and WhatsApp business management.
4. Configure Webhooks:
In the WhatsApp section of your app, click "Configure webhooks".
Get the Callback URL and Verify Token from BotSailor's dashboard under "Connect WhatsApp".
Paste these into the respective fields in the Facebook Developer console.
5. Add a Phone Number:
Provide and verify your business phone number in the WhatsApp section.
6. Change App Mode to Live:
Go to Basic Settings, add Privacy Policy and Terms of Service URLs, then toggle the app mode to live.
7. Connect to BotSailor:
On BotSailor, go to "Connect WhatsApp" in the dashboard.
Enter your WhatsApp Business Account ID and the access token.
Click "Connect".
For a detailed guide, refer to our documentation. YouTube tutorial. and also read Best chatbot building platform blog

3 notes
·
View notes
Text
Crypto trading mobile app
Designing a Crypto Trading Mobile App involves a balance of usability, security, and aesthetic appeal, tailored to meet the needs of a fast-paced, data-driven audience. Below is an overview of key components and considerations to craft a seamless and user-centric experience for crypto traders.
Key Elements of a Crypto Trading Mobile App Design
1. Intuitive Onboarding
First Impressions: The onboarding process should be simple, guiding users smoothly from downloading the app to making their first trade.
Account Creation: Offer multiple sign-up options (email, phone number, Google/Apple login) and include KYC (Know Your Customer) verification seamlessly.
Interactive Tutorials: For new traders, provide interactive walkthroughs to explain key features like trading pairs, order placement, and wallet setup.
2. Dashboard & Home Screen
Clean Layout: Display an overview of the user's portfolio, including current balances, market trends, and quick access to popular trading pairs.
Market Overview: Real-time market data should be clearly visible. Include options for users to view coin performance, historical charts, and news snippets.
Customization: Let users customize their dashboard by adding favorite assets or widgets like price alerts, trading volumes, and news feeds.
3. Trading Interface
Simple vs. Advanced Modes: Provide two versions of the trading interface. A simple mode for beginners with basic buy/sell options, and an advanced mode with tools like limit orders, stop losses, and technical indicators.
Charting Tools: Integrate interactive, real-time charts powered by TradingView or similar APIs, allowing users to analyze market movements with tools like candlestick patterns, RSI, and moving averages.
Order Placement: Streamline the process of placing market, limit, and stop orders. Use clear buttons and a concise form layout to minimize errors.
Real-Time Data: Update market prices, balances, and order statuses in real-time. Include a status bar that shows successful or pending trades.
4. Wallet & Portfolio Management
Asset Overview: Provide an easy-to-read portfolio page where users can view all their holdings, including balances, performance (gains/losses), and allocation percentages.
Multi-Currency Support: Display a comprehensive list of supported cryptocurrencies. Enable users to transfer between wallets, send/receive assets, and generate QR codes for transactions.
Transaction History: Offer a detailed transaction history, including dates, amounts, and transaction IDs for transparency and record-keeping.
5. Security Features
Biometric Authentication: Use fingerprint, facial recognition, or PIN codes for secure logins and transaction confirmations.
Two-Factor Authentication (2FA): Strong security protocols like 2FA with Google Authenticator or SMS verification should be mandatory for withdrawals and sensitive actions.
Push Notifications for Security Alerts: Keep users informed about logins from new devices, suspicious activities, or price movements via push notifications.
6. User-Friendly Navigation
Bottom Navigation Bar: Include key sections like Home, Markets, Wallet, Trade, and Settings. The icons should be simple, recognizable, and easily accessible with one hand.
Search Bar: A prominent search feature to quickly locate specific coins, trading pairs, or help topics.
7. Analytics & Insights
Market Trends: Display comprehensive analytics including top gainers, losers, and market sentiment indicators.
Push Alerts for Price Movements: Offer customizable price alert notifications to help users react quickly to market changes.
Educational Content: Include sections with tips on technical analysis, crypto market basics, or new coin listings.
8. Social and Community Features
Live Chat: Provide a feature for users to chat with customer support or engage with other traders in a community setting.
News Feed: Integrate crypto news from trusted sources to keep users updated with the latest market-moving events.
9. Light and Dark Mode
Themes: Offer both light and dark mode to cater to users who trade at different times of day. The dark mode is especially important for night traders to reduce eye strain.
10. Settings and Customization
Personalization Options: Allow users to choose preferred currencies, set trading limits, and configure alerts based on their personal preferences.
Language and Regional Settings: Provide multilingual support and regional settings for global users.
Visual Design Considerations
Modern, Minimalist Design: A clean, minimal UI is essential for avoiding clutter, especially when dealing with complex data like market trends and charts.
Color Scheme: Use a professional color palette with accents for call-to-action buttons. Green and red are typically used for indicating gains and losses, respectively.
Animations & Micro-interactions: Subtle animations can enhance the experience by providing feedback on button presses or transitions between screens. However, keep these minimal to avoid slowing down performance.
Conclusion
Designing a crypto trading mobile app requires focusing on accessibility, performance, and security. By blending these elements with a modern, intuitive interface and robust features, your app can empower users to navigate the fast-paced world of crypto trading with confidence and ease.
#uxbridge#uxuidesign#ui ux development services#ux design services#ux research#ux tools#ui ux agency#ux#uxinspiration#ui ux development company#crypto#blockchain#defi#ethereum#altcoin#fintech
2 notes
·
View notes
Text
Top 10 Front-End Frameworks and Libraries for 2024
As the web development landscape continues to evolve, staying updated with the latest front-end frameworks and libraries is crucial for any developer. Whether you're a seasoned pro or just starting out, knowing which tools to use can significantly impact your productivity and the quality of your projects. In this post, we’ll explore the top 10 front-end frameworks and libraries that are set to dominate in 2024.
1. React
React remains one of the most popular front-end libraries, known for its simplicity and flexibility.
Key Features of React
Component-Based Architecture: Reusable components make development efficient and manageable.
Virtual DOM: Enhances performance by minimizing direct DOM manipulation.
Strong Community Support: A vast ecosystem of tools, libraries, and tutorials.
2. Angular
Angular, backed by Google, is a powerful framework for building dynamic single-page applications (SPAs).
Why Choose Angular?
Two-Way Data Binding: Synchronizes data between the model and the view.
Dependency Injection: Improves code maintainability and testability.
Comprehensive Documentation: Extensive resources for learning and troubleshooting.
3. Vue.js
Vue.js has gained popularity due to its gentle learning curve and versatility.
Advantages of Vue.js
Reactive Data Binding: Simplifies state management.
Single-File Components: Encapsulate HTML, CSS, and JavaScript in one file.
Flexibility: Can be used for both large-scale and small-scale applications.

4. Svelte
Svelte is a relatively new player that compiles components into highly efficient vanilla JavaScript at build time.
Svelte’s Standout Features
No Virtual DOM: Directly manipulates the DOM for better performance.
Less Boilerplate: Cleaner code with minimal overhead.
Ease of Use: Intuitive and straightforward syntax.

5. Bootstrap
Bootstrap is a front-end framework that provides pre-designed components and a responsive grid system.
Benefits of Using Bootstrap
Responsive Design: Ensures your site looks great on all devices.
Pre-Styled Components: Saves time with ready-to-use UI elements.
Customizable: Easily customize with Sass variables and Bootstrap’s extensive options.
6. Tailwind CSS
Tailwind CSS is a utility-first CSS framework that allows for rapid UI development.
Tailwind CSS Features
Utility-First Approach: Use utility classes directly in your HTML.
Customizable: Extensive configuration options to suit your project’s needs.
Consistency: Enforces a consistent design language across your project.

7. Ember.js
Ember.js is a robust framework for building ambitious web applications.
Why Ember.js Stands Out
Convention over Configuration: Reduces the amount of decision-making and boilerplate code.
Strong Routing: Powerful routing capabilities for managing application state.
Productivity: Focuses on developer productivity with built-in best practices.

8. Alpine.js
Alpine.js offers a minimal and lightweight way to add interactivity to your websites.
Key Features of Alpine.js
Lightweight: Small footprint with only a few kilobytes.
Declarative Syntax: Similar to Vue.js, making it easy to understand and implement.
Ease of Integration: Can be easily integrated into existing projects.

9. Next.js
Next.js is a popular React framework that enables server-side rendering and static site generation.
Benefits of Using Next.js
Server-Side Rendering (SSR): Improves performance and SEO by rendering pages on the server.
Static Site Generation (SSG): Pre-renders pages at build time for fast load times.
API Routes: Allows you to create API endpoints within your application.

10. Lit
Lit is a simple library for building fast, lightweight web components.
Advantages of Lit
Web Components: Embraces the web components standard for reusable, encapsulated HTML elements.
Performance: Lightweight and highly performant.
Simple API: Easy to learn and use with a minimal API surface.
Conclusion
Choosing the right front-end framework or library can significantly impact your workflow and the quality of your projects. Whether you prefer the flexibility of React, the structure of Angular, or the simplicity of Svelte, there's a tool out there to suit your needs.
Final Tips for Selecting a Framework or Library
Project Requirements: Consider the specific needs of your project.
Community and Support: Look for frameworks with strong community support and documentation.
Learning Curve: Choose a tool that matches your current skill level and the time you have available to learn.
By staying informed about the latest tools and trends, you can ensure that your skills remain relevant and that you can deliver the best possible results in your projects. Happy coding!
Remember, the best tool is the one that helps you get the job done efficiently and effectively. So, dive into these frameworks and libraries, and take your front-end development skills to the next level!
Share Your Thoughts
I'm curious to know your thoughts on these front-end frameworks and libraries. Have you used any of them in your projects? Which one is your favorite, and why? Share your experiences and insights in the comments below.👇
2 notes
·
View notes
Text
Deciding Between Selenium with Python and Selenium with Java: An In-Depth Comparison
In the domain of automated testing, Selenium emerges as a pivotal tool for ensuring the reliability and quality of web applications. When it comes to selecting the programming language to harness Selenium's capabilities, two prominent contenders often come into play: Python and Java. Both languages offer distinct advantages and considerations, making the decision between them crucial for any automation project.

In this blog post, we'll conduct a thorough comparison of Selenium with Python and Selenium with Java, exploring their unique strengths, use cases, and factors to consider. By the end, readers will have a clearer understanding of which option aligns best with their project requirements, team proficiencies, and organizational objectives.
Python with Selenium:
Python, celebrated for its simplicity and readability, has garnered significant traction within the automation testing community. Let's delve into some key benefits of leveraging Python with Selenium:
Simplicity and Readability: Python's hallmark characteristics include simplicity and readability. Its concise syntax enables developers to express ideas in fewer lines of code, resulting in scripts that are easier to comprehend and maintain. For testers, this translates to expedited development cycles and reduced overhead in managing test suites.
Extensive Ecosystem: Python boasts a vast ecosystem of libraries and frameworks that complement Selenium, augmenting its capabilities for test automation. Whether handling data manipulation, conducting API testing, or generating test reports, Python's rich library support caters to diverse automation needs. Furthermore, the active Python community ensures an abundance of resources, tutorials, and documentation to aid testers throughout the automation journey.
Rapid Prototyping: Python's dynamic nature lends itself well to rapid prototyping and iterative development. Testers can swiftly experiment with different approaches, adapt scripts on-the-go, and respond promptly to evolving requirements. This flexibility seamlessly aligns with agile development methodologies, empowering teams to deliver high-quality software with agility.
Integration Compatibility: Python's interoperability with other tools and technologies makes it an appealing choice for Selenium automation. Whether integrating with continuous integration (CI) pipelines, test reporting frameworks, or version control systems, Python's versatility ensures smooth interoperability, streamlining the testing workflow and bolstering overall efficiency.

Java with Selenium:
Java, renowned for its robustness and performance, has long been a cornerstone in enterprise software development. Here are some compelling reasons to consider Java for Selenium automation:
Robustness and Performance: Java's static typing and strong object-oriented principles contribute to the robustness and performance of Selenium test suites. Its compile-time error checking aids in identifying potential issues early in the development phase, resulting in more stable and reliable automation scripts. For large-scale enterprise projects with stringent quality requirements, Java's reliability is a significant asset.
Widespread Adoption: Java enjoys widespread adoption within the enterprise landscape, making it a natural choice for organizations with existing Java codebases or a Java-centric development environment. The abundance of Java expertise in the workforce, coupled with extensive community support and industry recognition, solidifies its status as a preferred language for Selenium automation in many corporate settings.
Mature Tooling: Java's mature ecosystem of testing tools and frameworks, including JUnit and TestNG, seamlessly integrate with Selenium to offer comprehensive test automation solutions. These frameworks furnish advanced features such as parameterized testing, parallel execution, and built-in reporting capabilities, empowering testers to design and execute sophisticated test suites effortlessly.
Enterprise Support: Java's popularity in enterprise environments translates to robust support from vendors, extensive documentation, and a plethora of third-party integrations. For organizations seeking enterprise-grade features, reliability, and scalability in their Selenium automation endeavors, Java's ecosystem and support infrastructure present a compelling value proposition.
Conclusion:
In summary, both Selenium with Python and Selenium with Java present compelling options for test automation, each with its unique strengths and considerations. Python excels in simplicity, rapid development, and a vast ecosystem, making it an ideal choice for agile teams and projects with evolving requirements. Conversely, Java offers robustness, performance, and widespread enterprise support, rendering it well-suited for large-scale enterprise applications with stringent quality standards.
Ultimately, the decision between Python and Java for Selenium automation hinges on various factors such as project prerequisites, team proficiencies, and organizational preferences. By meticulously evaluating these factors and weighing the pros and cons of each option, stakeholders can make informed decisions that align with their specific needs and aspirations. Whether opting for the simplicity of Python or the robustness of Java, Selenium remains an indispensable tool for driving quality and efficiency in web application testing.
2 notes
·
View notes
Text
Storing images in mySql DB - explanation + Uploadthing example/tutorial
(Scroll down for an uploadthing with custom components tutorial)
My latest project is a photo editing web application (Next.js) so I needed to figure out how to best store images to my database. MySql databases cannot store files directly, though they can store them as blobs (binary large objects). Another way is to store images on a filesystem (e.g. Amazon S3) separate from your database, and then just store the URL path in your db.
Why didn't I choose to store images with blobs?
Well, I've seen a lot of discussions on the internet whether it is better to store images as blobs in your database, or to have them on a filesystem. In short, storing images as blobs is a good choice if you are storing small images and a smaller amount of images. It is safer than storing them in a separate filesystem since databases can be backed up more easily and since everything is in the same database, the integrity of the data is secured by the database itself (for example if you delete an image from a filesystem, your database will not know since it only holds a path of the image). But I ultimately chose uploading images on a filesystem because I wanted to store high quality images without worrying about performance or database constraints. MySql has a variety of constraints for data sizes which I would have to override and operations with blobs are harder/more costly for the database.
Was it hard to set up?
Apparently, hosting images on a separate filesystem is kinda complicated? Like with S3? Or so I've heard, never tried to do it myself XD BECAUSE RECENTLY ANOTHER EASIER SOLUTION FOR IT WAS PUBLISHED LOL. It's called uploadthing!!!
What is uploadthing and how to use it?
Uploadthing has it's own server API on which you (client) post your file. The file is then sent to S3 to get stored, and after it is stored S3 returns file's URL, which then goes trough uploadthing servers back to the client. After that you can store that URL to your own database.

Here is the graph I vividly remember taking from uploadthing github about a month ago, but can't find on there now XD It's just a graphic version of my basic explanation above.
The setup is very easy, you can just follow the docs which are very straightforward and easy to follow, except for one detail. They show you how to set up uploadthing with uploadthing's own frontend components like <UploadButton>. Since I already made my own custom components, I needed to add a few more lines of code to implement it.
Uploadthing for custom components tutorial
1. Imports
You will need to add an additional import generateReactHelpers (so you can use uploadthing functions without uploadthing components) and call it as shown below
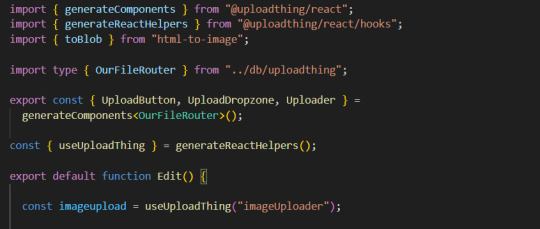
2. For this example I wanted to save an edited image after clicking on the save button.
In this case, before calling the uploadthing API, I had to create a file and a blob (not to be confused with mySql blob) because it is actually an edited picture taken from canvas, not just an uploaded picture, therefore it's missing some info an uploaded image would usually have (name, format etc.). If you are storing an uploaded/already existing picture, this step is unnecessary. After uploading the file to uploadthing's API, I get it's returned URL and send it to my database.

You can find the entire project here. It also has an example of uploading multiple files in pages/create.tsx
I'm still learning about backend so any advice would be appreciated. Writing about this actually reminded me of how much I'm interested in learning about backend optimization c: Also I hope the post is not too hard to follow, it was really hard to condense all of this information into one post ;_;
#codeblr#studyblr#webdevelopment#backend#nextjs#mysql#database#nodejs#programming#progblr#uploadthing
4 notes
·
View notes
Text
Build Your First AI Agent And Grow as an AI Engineer.
Let me tell you a secret: You don’t need to be a genius or have a master’s degree to start building with AI.
You just need curiosity, a problem to solve, and the guts to get started.

I used to watch people build AI tools on Twitter and think,
“That’s cool, but I don’t even know where to start.”
Then I built my first AI agent.
Not perfect. Not fancy. But real. And that one project taught me more in a week than 3 months of tutorials.
Here’s how building an AI agent can actually grow you as an engineer—and how to start without feeling overwhelmed 👇
💡 What Even Is an AI Agent? Think of it like this:
An AI agent is a little digital brain that:
Takes in a request (like: “Book a meeting with Sarah next week”)
Thinks about what to do (using logic or language models)
Then acts (books the meeting, sends a message, fetches info, etc.)
It’s smarter than a chatbot. It’s not just replying, it’s doing.
🧠 Why Building One Is a Game-Changer (Even for Beginners) Because you stop just learning about AI—and start thinking like an AI engineer:
You’ll learn how to:
Talk to LLMs (hello, prompt engineering!)
Integrate tools & APIs
Handle memory and multi-step logic
Actually ship something useful
It forces you to stop watching and start building. That’s where real growth happens.
✅ What I Did (And What You Can Do Too) I picked something simple: 💬 An AI that helps summarize articles and emails (because I was drowning in both).
No fancy UI. Just a command line and some Python.
I used:
OpenAI’s API
LangChain (to help structure the agent)
Streamlit (for a basic interface later)
And I kept the mindset simple:
Make it work first. Make it better later.
🔁 Here’s How to Build Your First Agent (Without Freaking Out)
Pick a Real-Life Use Case You Care About Forget “impressive.” Go for useful. – Summarize long articles? – Help you write daily reports? – Plan your meals or track your habits?
Start With One Input + One Output Don’t overcomplicate. Input: a request from the user. Output: a clear action or response.
Then build around it.
Use What’s Already Out There You don’t need to start from scratch. Use LangChain, LlamaIndex, OpenAI functions—whatever helps you move faster.
Break it. Fix it. Repeat. This part matters: you’re going to break things. You’ll run into bugs, dumb outputs, missing APIs. That’s not failure—it’s the curriculum.
Show Your Work Share it. Demo it. Write a short post like this. Talk about what worked, what didn’t, and what you learned.
This isn’t just a project—it’s your story.
🚀 What Happens When You Build Your First Agent? You stop doubting yourself.
You start seeing problems as buildable solutions.
You go from “consumer” to creator.
You’re not just learning AI. You’re becoming an engineer who builds with it.
🗣️ Real Talk: You don’t need to build the next Siri. You just need to start.
One small project. One tool. One messy build that teaches you more than any tutorial.
AI isn’t just for researchers anymore. It’s for builders. And you’re already one.
0 notes
Text
Master Profitable Algorithmic Strategies with the Best Algo Trading Course at ICFM – Stock Market Institute

Learn Algorithmic Trading with ICFM’s Industry-Leading Algo Trading Course in India
In today’s tech-driven financial landscape, algorithmic trading has rapidly gained prominence among retail and institutional traders alike. With the power of automation and quantitative models, traders can now execute strategies with speed, accuracy, and discipline. For individuals interested in tapping into this high-potential domain, enrolling in a top-tier algo trading course is essential. ICFM – Stock Market Institute stands out as a leading institution offering a comprehensive and practical algo trading course that prepares traders to develop, test, and execute strategies using algorithms in real market environments.
Why Choose ICFM’s Algo Trading Course for Practical Algorithmic Training
The algo trading course at ICFM is designed specifically for Indian financial markets and customized to suit both beginners and intermediate-level traders. What makes ICFM’s program stand out is its hands-on, application-oriented approach, where students learn by doing. Unlike generic online tutorials, the algo trading course at ICFM delves deep into the actual tools, coding languages, and broker integrations needed to succeed in algorithmic trading. The institute leverages real-time data, simulations, and back-testing environments to ensure every student builds confidence in their strategies before going live.
What the Algo Trading Course Covers at ICFM – Stock Market Institute
ICFM’s algo trading course offers a complete roadmap that begins with the basics of algorithmic trading and progresses to advanced strategy creation. The course introduces students to the foundations of quantitative finance, market microstructure, and order types. It then moves on to programming essentials—particularly in Python, which is the most widely used language in algorithmic trading. Students learn how to work with data feeds, historical data analysis, and strategy logic development.
A key feature of the algo trading course is its focus on back-testing and optimization. Learners are trained to test their strategies using historical market data, tweak parameters for better performance, and avoid overfitting. They also explore API integration with popular broker terminals, enabling them to automate their strategies in a live trading environment. With the right mix of theory, coding, and practical market application, this algo trading course sets students on a professional trajectory.
Real-Time Practice and Market-Integrated Learning
At ICFM, the algo trading course is not just about learning how algorithms work but also about understanding how they interact with real markets. Students are guided through market simulations where their codes run in real-time environments to analyze tick-by-tick data. This invaluable exposure helps them understand latency issues, slippage, and the importance of execution logic in algorithmic trading. By integrating trading platforms, brokers, and data providers, ICFM ensures that students can deploy their strategies in NSE and BSE markets seamlessly.
Expert Faculty and Advanced Mentoring Support
The algo trading course at ICFM is conducted by seasoned professionals with expertise in trading, financial modeling, and quantitative analysis. These mentors bring years of industry experience and guide students beyond just the curriculum. Their insights into how institutional-level strategies are built and deployed provide learners with a deep edge. The instructors encourage interaction, discussion, and one-on-one mentoring throughout the algo trading course. Even after course completion, students have access to ICFM’s support ecosystem where they can ask questions, troubleshoot errors, and receive updates on market developments relevant to algo trading.
Flexible Learning Modes and Recognized Certification
To accommodate the diverse needs of working professionals, students, and traders, ICFM offers both classroom and online formats for the algo trading course. Learners can join sessions physically in Delhi or opt for remote learning with full access to live classes, recordings, and learning material. The flexibility of this model allows for a more personalized pace and style of learning. Upon successful completion of the algo trading course, students are awarded a certificate from ICFM – Stock Market Institute. This certification is well-regarded in the financial industry and adds weight to professional profiles for roles in trading, quant research, and financial analysis.
Success Stories and Career Pathways After the Algo Trading Course
Over the years, ICFM’s algo trading course has empowered hundreds of students to launch successful careers in trading and finance. Many have gone on to become independent algo traders, quant analysts, and strategy developers for proprietary trading firms. The course has also helped business professionals add automation to their investment routines and optimize performance. Testimonials frequently highlight the clarity of instruction, depth of the content, and real-world application as key reasons for their successful transition into the algo trading space. Whether someone is looking to scale their trading operations or enter the world of quant finance, this algo trading course provides a strong foundation.
Conclusion: Take the Smart Step Towards Automated Trading with ICFM’s Algo Trading Course
As financial markets become faster and more data-driven, traditional manual trading methods are gradually being replaced by algorithmic strategies. If you aspire to stay ahead in this rapidly evolving domain, the algo trading course by ICFM – Stock Market Institute is your ideal entry point. With expert-led training, cutting-edge tools, live market exposure, and continuous support, ICFM equips you to confidently navigate the world of algorithmic trading. Enroll today in India’s most comprehensive algo trading course and take control of your trading future with technology and precision.
Read more: https://www.icfmindia.com/blog/stock-market-courses-in-delhi-online-free-get-ahead-without-spending-a-rupee
Read more: https://www.openpr.com/news/4065877/shocking-air-india-crash-triggers-stock-market-panic-across
0 notes